

How To Install Blue Yeti Microphone Windows 10

In this guide, we will show you how to ready and how to utilise a Bluish Yeti USB microphone on Windows 10 and macOS. Follow the sections below to get started.
- Install the Blue Yeti driver
- How to gear up a Blue Yeti
- Blue Yeti setup for Windows 10
- Bluish Yeti setup for macOS
- How to set up a Blue Yeti for streaming
IMPORTANT: The Yeti Pro is the only microphone in the Yeti serial that requires a driver. The rest of the Yeti family is class-compliant both on PC and Mac.
To connect the Bluish Yeti Pro to your computer, its driver software must first exist installed. If the drivers aren't installed, in that location may be connectivity and software issues with your Blue Yeti. Follow these steps to download the Blue Yeti driver.
- Go to the Blue Yeti Pro page on the Blue website, and scroll down to Yeti Pro Commuter.
- Connect the Blue Yeti to your reckoner.
- Go to your Downloads folder, excerpt the BLUE_YetiPro_DriverSetup_v2.**.* binder, and then double-click the .exe installer. If you're a Mac user, open the _MACOSX folder, then double click the installer file.
- One time the driver is installed, restart your reckoner.
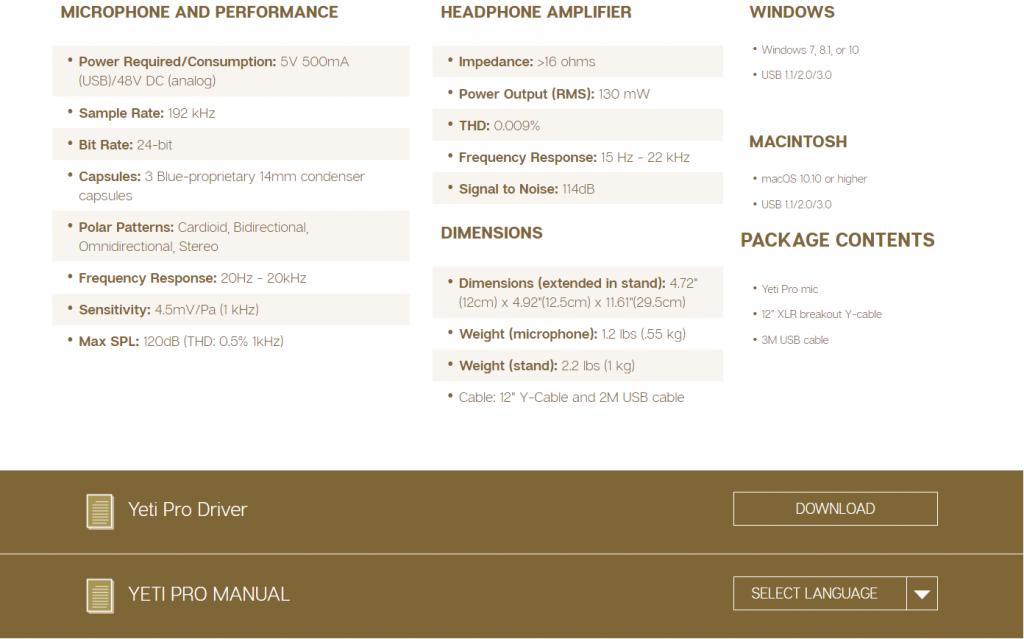
Click the image to download the Yeti Pro driver.
Return to top
Important: The Bluish Yeti cannot exist continued to your computer and your audio interface or mixer (analog) simultaneously. When the Yeti is connected to your external analog device, the headphone jack is disabled, so yous volition need to monitor via the preamp, interface, or mixer.
The Yeti must be selected equally the operating system'south chief sound device to get it to work correctly. For most applications, this will be done from Sound Settings (Windows) or Sound Preferences (Mac). Near streaming and recording software take their own sound settings, so when using the Yeti, you'll need to make sure that information technology's selected every bit the primary input and output device.
This means your streaming software or other related audio software needs to know what the computer's sound device is and which input and output streams are which. In one case you've continued the Yeti to your reckoner, follow these steps to update your Windows or macOS sound settings.
- Right-click the speaker icon on the Windows toolbar, then click Sound.
- Click the Playback tab, right-click " Speakers Blueish Yeti," then click Ready as Default Playback Device, then select Set as Default Communication Device.
- Right-click " Speakers BLUE Yeti" again, select Properties, and and so click on the Avant-garde tab.
- Uncheck the "Allow applications…" box within the Exclusive Mode section, click Apply, and so click OK.
- You'll also need to open the Advanced window to change your sample rate when updating your software's sound settings.
- From the Carte du jour bar, click the Apple icon, then select Organization Preferences.
- Click Audio.
- Nether the Input and Output tabs, choose your Blue Yeti.
- You'll also need to use the Format dropdown box to change the sample rate when updating your software's audio settings.
If the Yeti isn't showing upward when connecting information technology to your estimator, reconnect the mic by unplugging and plugging it back in. If you have not washed so yet, endeavour reconfiguring the USB connections so that the Bluish Yeti is connected straight to your computer. If the problem persists, attempt a unlike USB port or cablevision. Visit our Windows and Mac guides for more tips on resolving audio device connectivity.
Return to meridian
Like your computer's main sound settings, your Yeti needs to be set up inside your streaming or recording software to piece of work correctly. Not only that, only yous'll also need to go into the Yeti Control Panel and update its USB Streaming Mode and ASIO Buffer Size, so it matches that of your streaming or recording software. Also, be sure to check out our article to learn more nearly Buffer and Latency.
- Launch your streaming or recording software and get to its audio settings menu.
- Navigate to the Input and Output section and fix your Blueish Yeti every bit the main input and output device. Take note of the sample rate listed.
- Click the Up pointer on the windows taskbar and left-click the Blue logo icon.
- If two instances are being displayed, hover over them and left-click the ane that says Yeti Control Console.
- Click the Buffer Settings tab, use the dropdown boxes to set the USB Streaming Style and ASIO Buffer Size.
- Delight note that lower Streaming Mode and Buffer Size settings have up more computer resource, and so consider that when you update these.
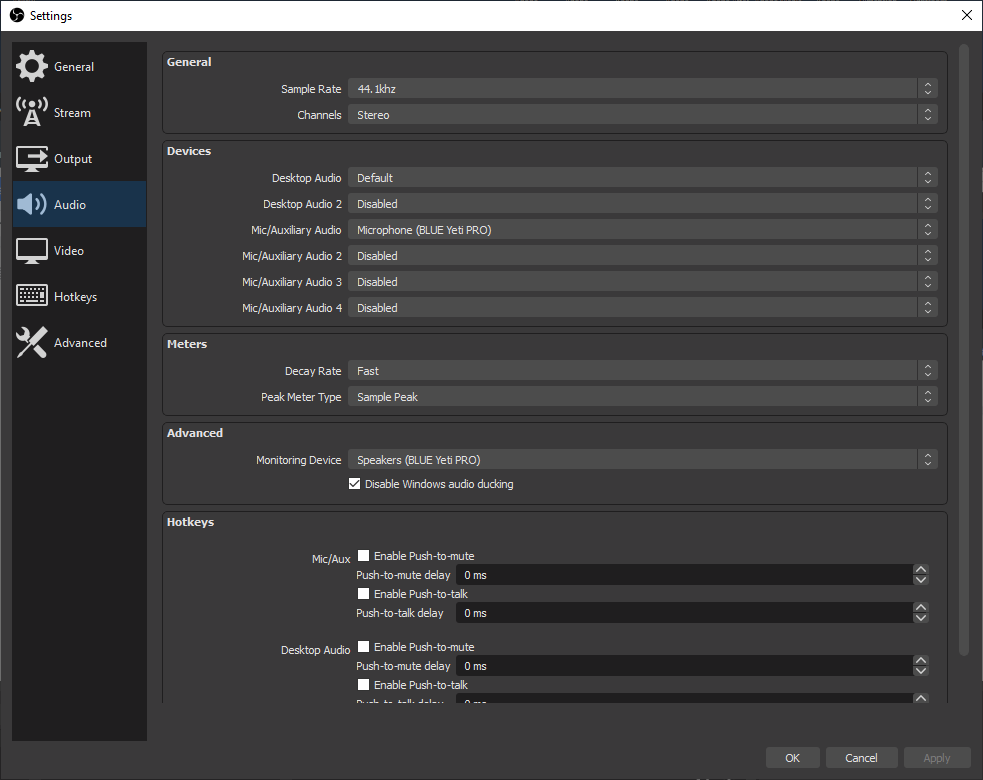
Updating audio settings in OBS.
Render to elevation
Related Articles
When you demand help, Sweetwater has the answers!
Our knowledge base contains over 28,000 expertly written tech articles that volition give you answers and aid you go the virtually out of your gear. Our pro musicians and gear experts update content daily to keep you informed and on your style. Best of all, information technology's totally FREE, and information technology's but some other reason that you get more at Sweetwater.com.

Source: https://www.sweetwater.com/sweetcare/articles/blue-yeti-setup-guide/
Posted by: morgandession.blogspot.com
0 Response to "How To Install Blue Yeti Microphone Windows 10"
Post a Comment